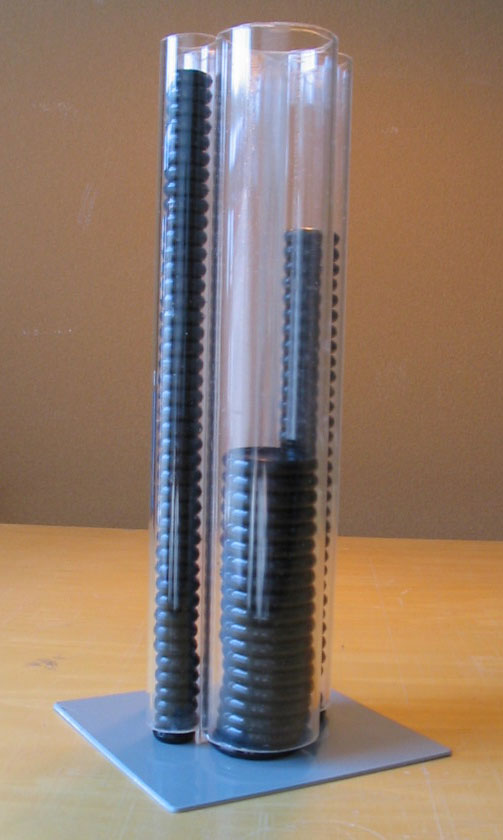
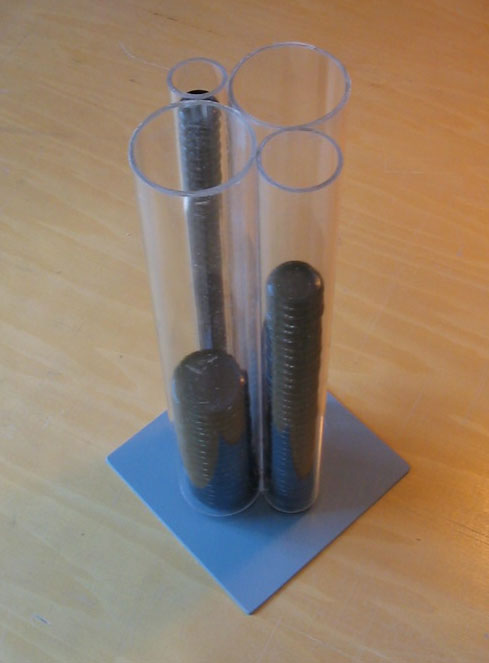
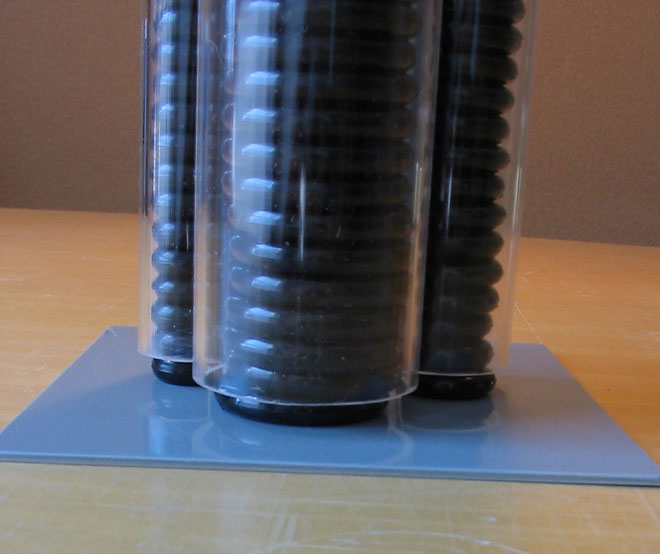
 The Tuesday Hack is a little early this week because I couldn’t wait to introduce my weekend DIY project: a prototype Rollabind ring dispenser.
As I’ve already described, my paper file management system is now based almost entirely on Rollabind. And with one exception, the transition has been as smooth as I could have ever hoped for. The one exception? Where to put all the discs.
I’ve been collecting rings on an as-needed basis — ordering them a bag or two at a time from Rollabind or Levenger and keeping the leftovers in the original baggies which I kept in a box. Up to a point this technique worked fine, but it was — well, inelegant. And since much of the Rollabind aesthetic derives from its sense of order, I wanted to find a better, more orderly solution. One that showed me how many discs I had, made discs easy to get, and didn’t take up much room in my crowded supply closet.
Here’s how I made the proptotype . . .
 One of my other hobbies is plastic scale modeling, particularly a subset called “scratchbuilding.” And as scratchbuilders know, there is no cooler hobby store on Earth than the website of Plastruct, Inc. Plastruct makes just about anything out of styrene, acrylic, and plastics I can’t even pronounce. Tubes, domes, spheres, and even scale valves, handwheels, and — I kid you not — manhole covers. Not only did they have everything I needed for this project, but while looking around I found things that inspired at least three new models. Darn.
The core of the dispenser is four clear acrylic tubes (0.75″, 1″, and two 1.5″) that have inner diameters (I.D.s) close to the diameters of the Rollabind rings. The tubes come in either 18″ or 36″ lengths; I ordered the shorter lengths; I found that they actually varied from 18.5″ to almost 19″.
I cut each of the tubes into 9″ lengths, which is slightly over the length of 44 discs (i.e., four classic binders’ worth). The bottom of each tube is notched to allow the discs to be slid out one at a time — the notch is the height of one disc (5mm) to keep the discs from falling out while still allowing me to slide them out one at a time. I then glued them together using a water-thin acrylic adhesive, also available from Plaststruct.
 Now because this is a prototype, there are some design flaws that can only shake out in practice. I had hoped that the bottom notches would be tall enough to allow ordinary mortal fingers to reach in there and nudge out each disc, but the combination of the short notch plus the thickness of the acrylic makes the discs hard to reach. I’ve found that a slender pen tip (or the blunt edge of a knife) works just fine, though.
Plastruct doesn’t make a tube with an I.D. near the size of a large ring (7/8″). You’ll see from the pictures that two of the tubes are the same diameter. The large tube is perfect for the jumbo size discs, but I’m going to have to fabricate an insert for the other one to bring it down to the size of the large discs. I have an idea in mind, but haven’t built it yet.
The basic concept suggests all kinds of possible improvements in future models — hopefully readers will be inspired to try these variations and also come up with more of their own:
- Taller notches with sliding covers that would keep the discs from falling out when not in use
- A top-dispensing model in the style of a Pez dispenser, using springs in each tube
- A mechanical version in the style of a change dispenser, which dispenses a binder’s worth of rings at the push of a button or turn of a knob
- Mix and match tubes that let you insert additional ones for the disc sizes you use more often
I hope this little invention inspires you to improve on the basic concept. If it does, please feel free to post links in the comments below. And if (when) I make any improvements of my own, I’ll do likewise.
How do you store your rings?

That’s brilliant!!! I just ordered some rings. so this hack will come in handy.
I love this. I am using the baggie method myself, and my husband asks me things like “how many of the small black discs do we have”? So i have to dig out all the little bags from wherever I stashed them; not very efficient.
Since my organizational systems are still in quite a bit of flux, I need some kind of organization, but this looks too big for me, since I have limited desk real estate. I’m thinking that something that lies flat would work better for me. I need to work with it a little more . . . the whole thing is still evolving . . .
@Duc: Thanks! *Blush.* If you assemble one, please do post pictures somewhere so we can all go and admire. Hopefully you’ll be able to fix some of the shortcomings of my prototype.
@Shirl: Glad you like! It definitely has a sizable footprint. Mine lives in the supply closet and even there it’s kind of in the way. The original design was going to be wall-mounted with the tubes laid out next to each other like organ pipes. That might take up less space, but it proved harder for me to build than I thought. Over on diyplanner.org, people have also suggested looking at poker chip holders and coin holders, which might be more desk-friendly.
I’m toying with the idea of making a template for people to print and cut paper rolls like you would use to roll coins — for all disc sizes, in sets of 11 for classic binders and 8 for junior binders. I don’t know if that would even work, but it might be fun to try!
This is sheer genius. I’ve posted it on my blog as a link, because the damn thing is just so beautiful as well as a good idea.
Hi, Quinn —
Thanks! *More blush.* Sorry I haven’t replied sooner; it’s been a very busy week! It seems funny to me that Levenger, Rollabind, etc. have so many great “front end” materials like covers, inserts, etc., but nothing for ring storage. I hope my modest little hack helps call attention to this crying need. (Hey, Levenger! KA-CHING!)
After all, the whole premise of the rings is that they help you organize everything, right? The ideal solution would be as aesthetically clean and handily innovative as the ring idea itself…